Saturday, September 15, 2012

Cooking with Zucchini, inspired by Guild Wars 2

Guild Wars 2 is terrible, because it so frequently makes me hungry. In real life, I had this ginormous zucchini from a family friend and it desperately needed use. One day in GW2, I'm cooking up a storm and discover some new zucchini recipes:


Genius. Challenge accepted!


I had great success! Here are the recipes I developed:


Rory Triscuit's Spicy Turkey & Zucchini Chili
1/2 lb ground turkey breast
1 cup black beans
1 red onion
1 white onion
1 green bell pepper
1 red bell pepper
1 jalapeno pepper
1/8 cup diced garlic
1/4 cup olive oil
1/4 cup molasses
1/4 tsp liquid hickory smoke
Chopped up zucchini in 1" pieces.
chili powder
chipotle powder
ground cumin
turmeric
paprika
cayenne

Soak beans overnight. Drain and boil in new water. Drain again and bring to simmer in a large pot. While beans are simmering, prepare everything else. Heat oil in a skillet at medium high temp and add diced onion. Cook until the onion is caramelized. Add ground turkey breast and spices. Cook turkey thoroughly, then add diced green and red bell pepper. If the beans are not yet ready, cover the turkey mixture and allow to cool. If the beans are ready, put everything prepared so far in the pot and keep on a simmer for another two hours or so. Add hickory smoke and molasses. The longer it simmers, the better. Add water whenever it gets too dry, keep cooking if there is still too much water. In the meantime, chop the zucchini into about 1" diameter, 1/4" width slices (I had a giant zucchini so chopped half of it into "coins" and then chopped those into fourths.) Make sure there are no seeds!

The recipe doesn't have to be too precise, so have fun with it! About an hour before you want to eat, add the chopped zucchini. You'll want it to be soft, but not gooey. Top it off with cilantro and guacamole, perhaps some green onion, salsa, sour cream or chipotle sauce, and you have yourself some gourmet chili!


Rory Triscuit's Gluten-Free Sugar-Free Zucchini Bread
1 1/2 cups gluten free flour
1 tsp ground cinnamon
1 Tbsp baking powder
1/2 tsp salt
1/2 tsp nutmeg
1/2 tsp ginger
1 tsp finely shredded orange (or lemon) peel
1 c finely shredded unpeeled zucchini
1/2 c xylitol
1/2 c Stevia
2 eggs
1/4 c applesauce (or fruit puree)
1/4 c olive oil
1 tsp vanilla

Preheat oven to 325 Fahrenheit. Combine in small mixing bowl flour, spices, and baking powder. In large mixing bowl beat together eggs, xylitol and Stevia, whisking rapidly for about five minutes until frothy. Add applesauce, oil, and vanilla to the mix and combine well. Stir in zucchini. Then gradually pour dry mixture into wet mixture and combine just enough to moisten the dry ingredients. Do not overstir! Pour batter into a well-oiled breadpan and bake for about 60 minutes or until you can insert a toothpick or fork in the center and it comes out clean. Cool in pan for half an hour. Run knife or flat blade along edges to ensure there is no sticking, then turn the bread out onto a cutting board. Best served fully cooled. Enjoy!

Thursday, September 13, 2012

HP Web Support is Ridiculous!

Already, I've been a little annoyed with the HP Pavilion DV7 Notebook because it has an Nvidia card which of course includes the brand new and amazing (obnoxious) CUDA technology. Annoyed because the CUDA technology occasionally causes my computer screen to black out when I switch between a game and my browser, or from my browser to a video, etc.

So when I'm uploading a YouTube video and my entire screen goes black and stays black, I of course freak out a little bit. When I restart my computer and the screen is still black, I really start to freak out. I even try plugging my laptop into the TV to see if perhaps it is merely the display, but no, the TV will not receive input. I try not to lose my head.

So I wait a few minutes and turn my laptop back on, and magically the graphics seem to be working again. I decide perhaps it is merely that my laptop has overheated, even though it is about 65 degrees Fahrenheit in my bedroom and I keep my laptop elevated and the vents uncovered. I wonder if perhaps it's time to do a little "Spring Cleaning". Shouldn't be too difficult to look up instructions on how to open up a laptop case, right?

Well, HP will have none of that. They strongly recommend against opening the laptop case. Here's what the official HP website suggests if you want to clean your laptop's fans:


So let me get this straight, HP. You want me to...

blow air into here...

which will then wind up here...


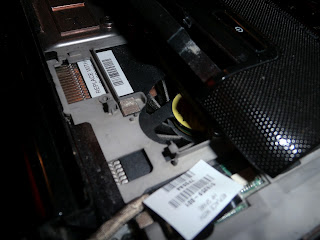
then eventually here, as evidenced by the dust bunnies I'd found...


and then finally here, where some moron at the factory had failed to fully seal the protective plastic.

(Click to embiggen. A couple dust bunnies are hanging out under the upper left corner of the plastic seal.)

My laptop is not a Nintendo game cartridge, thank you very much. But what really gets my goat is that once I clean my fan using your wonderful method, if that doesn't work, then I should move my laptop to a cooler room, and if that fails, then I should "Test for hardware failure."

Excuse me? Perhaps if you didn't tell me to blow dust bunnies even deeper into the crevices of my laptop, it wouldn't have hardware failure. Oh, I get it. That's what you want, because then some poor sap will have to call you, deal with the awful customer support, and then mail in the laptop to have parts replaced. Wow, HP. You haven't advanced much beyond your days as a printer manufacturing company.


If ever this laptop breaks, I will be getting myself an Alienware computer. I'm done with your company. Screw you and all your screws, and your dustbunny breeding practices.

Addendum:
I gotta add another little pet peeve I didn't mention before.
The person who didn't properly apply the plastic seal on the interior also failed to screw in the parts properly. I could tell that the person used an electric screwdriver to put each screw in completely, individually, one at a time, rather than screwing in each one most of the way and tightening them all after they were all in place. Thanks for causing a bunch of screws to sit diagonally, moron.

Tuesday, September 11, 2012

Rory's Gluten-Free, Sugar-Free Carrot Cake with Cream Cheese Frosting

Rory's GF&SF Carrot Cake

1 1/2 c. gluten free flour (Bob's Red Mill All-Purpose is good)
1/2 c. Stevia
1/2 c. Xylitol
1 tsp baking powder
1/2 tsp baking soda
1/2 tsp salt
1 tsp ground cinnamon
sprinkle of ground cloves and cardamom to taste; less is more
1 1/2 to 2 c. finely shredded carrot (use cheese grater)
1/4 c. coconut oil or butter
1/2 c. applesauce
4 eggs

Prehead oven to 300 degrees Fahrenheit. Combine dry ingredients except the sweeteners very well in a large bowl. In a small bowl, combine stevia, xylitol, and the eggs. Whisk the eggs and sweeteners until fluffy, then add and stir them into the dry mixture. Add coconut oil and applesauce. Do not overstir! Bake in a oiled and floured 9x9x2 inch pan for 45-50 mins.

[Note: When I first made this cake, I did not whisk the eggs and sugar separately from everything else, and I only used three eggs and erred on the side of less sweetener. The flavors of the cake were perfect, other than I think it wasn't quite sweet enough or fluffy enough. The above recipe is what I plan to do next time.]


Rory's GF&SF Cream Cheese Frosting

1 1/2 to 2 oz cream cheese
2 Tsbp coconut oil or butter
1-2 tsp vanilla
1/3 c. Stevia
1/3 c. Xylitol

Heat cream cheese and coconut oil in saucepan or microwave until slightly melted. Stir in vanilla and sweeteners until smooth. Cover and place in refrigerator until fully cooled. Apply to cooled carrot cake. (And really, make sure that cake is fully cooled, or the frosting will melt!)